Sunday, August 28, 2011

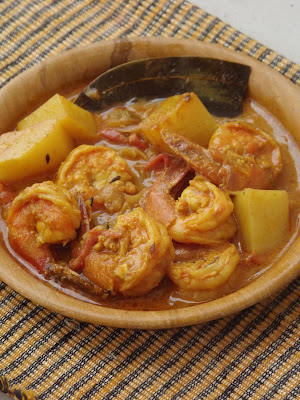
Tales from the coast....Prawn curry


Most people love prawns unless they are allergic to them. Whether boiled, sauted, grilled, baked, fried, stewed, curried this versatile fish( actually crustacean) tastes good in all forms. The only tip to remember is to never overcook them. Then they get all hard, dry and rubbery. So just toss them in, wait for the color to change and out they go. If adding straight into the gravy, add during the final stages of cooking. Some recipes call for them to be cooked with their shell. While this gets a little messy to eat once you have managed to get beyond the top layer there is some flavorsome, soft flesh beneath.

Being from the coast, prawn were quite popular in our household and cooked with regular frequency. Mom tried several versions too- chilly prawns- stir fry the prawns with some soya, vinegar, bell pepper, chillies, onion, garlic and tomatoes to a succulent finish. Yumm!

And then of course Prawns in a mustard base, prawns in a coconut gravy. Actually prawns lend themselves quite easily to all kinds of cuisine- toss a handful into pasta, fry them with some butter and pepper, cook them with some rice and veggies for a most delicious pulao, add them to your salads for flavor, body and taste. You can do just about anything with prawns.

We cooked a more basic version for lunch today. Quite easy to prepare, just stir together a few basic ingredients and you are done. Delicious.

Prawn Curry
Serves: 6

Ingredients

Prawn: 250 grams, medium sized
Onion: 2, finely chopped
Garlic: 4/5 pods, finely chopped
Ginger: 1 inch, grated
Green cardamom: 3
Cinnamon: 2 inch sticks
Bay leaves: 2
Jeera/cumin seeds: 1 tsp
Tomato: 2, finely chopped
Potato: 2, cubed( ideally the same size as the prawns)
Ghee: 1 tsp
Mustard oil: 2/3 tbsp
Green chillies: 2
Cumin/Jeera powder: 1.5 tsp
Corriander/Dhania powder: 1 tsp
Chilli powder: 1 tsp
Turmeric powder: 1 tsp

Method

  • Heat the oil in a wok/kadai till it starts to smoke.
  • Add the prawns( to which some turmeric and salt has been added), saute for a few minutes. Remember not to overcook them. Remove.
  • Into the same wok add the cumin seeds, bay leaves, onion, garlic and saute for a few minutes. Add cardamom and cinnamon sticks.
  • Add the cubed potatoes and cook.
  • Next, mix the grated ginger and dry spices( cumin, corriander, turmeric and chilli powder) with a little bit of water and add it to the wok. Add the tomatoes and cook till the tomatoes soften.
  • Add some warm water( about a cup or two) and let the gravy come to a boil. Add the prawn and let them cook for about 5/7 minutes or so. Add the slit green chillies. Check the salt and add more if necessary.
  • Finish off with some ghee.
  • Serve hot with plain steamed rice.

A very simple meal that leaves you feeling satiated- that I think is the power of simplicity.

Bon Apetit and Happy Cooking!

Saturday, August 27, 2011

From the land of butter and cream....Presenting Daal Makhni


I have never used as much butter and cream in one dish. Those of you who have read my earlier posts would have noticed that most of the dishes I write about are either low oil or no oil. Ironically this post(laden with butter and cream) follows the " Freedom from oil" post.

Well, in a weak moment I agreed to make " Daal Makhni" for sonny dear. In fact he played it out quite well, " Mom, you never make anything "rich"(emotional pressure), R's mother makes really nice Daal Makhni and Paneer Butter Masala(read come on Mom you ought to be the best)". That did it. Over the next few days I began my search for easy to prepare and authentic Punjabi recipes. Decided to start with Daal Makhni. Daal is considered a low involvement, low skill dish in most part of the country. Serves as an accompaniment and often passed over for other more interesting food . But in the North and for people from Punjab it is main course, staple food- Chole Kulche, Rajma Chawal, Tandoori Roti and Daal Makhni are popular combinations. There is a lot of painstaking effort that goes into making the perfect daal. Cooked on slow fire for hours, simmering brings out the flavor of the daals. So no quick pressure cooking and tempering.

This is As's( a true blue Punjabi) recipe. Her instructions were very precise and easy to follow. She also simplifies the steps which makes it easy for somebody making the dish for the first time. I think the best tip she gave me was to pick up " Roopak's Daal Makhni" masala. Roopak Masalas are easily available in most supermarkets in Delhi. I have used their Oregano seasoning, Dahi bhalla Masala, Biryani Masala. Thank God! for blended masalas, easy to replicate the taste each time. And like one of the ad says ' helps Mrs. Chawla make her Sambhar as good as Mrs. Reddy's'.

I love the concept of trying out food from different parts of the country/World. A global kitchen which is literally a melting pot of recipes, fusion food. Just thinking about it is exciting. And yes, the opportunity to make something new, different each day and for each meal. Wow! I was so excited about making this dish that I made it on a 'weekday' morning. Slow cooking does allow you to go about your chores as the dish cooks.

Daal Makhni( Serves 6/8)

Ingredients
Saboot Urad Daal: 1 cup
Rajma Daal: 1 handful
Tomato Puree: 10/12 tbsp
Garam Masala: 1tsp
Cream: 1 cup
Daal Makhni Masala: 3 heaped tsp
Butter: 2 tbsp
Refined oil: 1 tsp
Garam Masala: 1 tsp

Method
  • Soak the daal overnight in 8 cups of water.
  • Pressure cook the daal with 8 cups of water and salt to taste( this daal cooks for much longer than regular daals so do ensure you have added enough water else you risk burning it).
  • Let the cooker give out one whistle and then cook on low flame for 40 minutes. Keep aside and let the cooker cool down on its own.
  • Take a kadai/wok and heat the oil. Next add the tomato puree and cook for 10/15 minutes.
  • Mix the daal makhni masala in about half a cup of water and add it to the tomato puree. Cook for another ten minutes. Add butter
  • Add the tomato puree mixture to the daal and let it simmer for 20/25 minutes.
  • Add the cream and 1 tsp of garam masala
  • Served hot with rotis.
The boys just loved it. Younger one had it with rice(sacrilege, I know) and the older one with phulkas. The kitchen smells divine as the daal cooks. The daal has a smooth, creamy texture and all the ingredients blend together to create sheer magic. You will definitely have people asking for more.And for all you non-vegetarians reading this post, like I'd told my Dad years ago, 'Ghar ki daal murgi barabar'.

Bon Apetit and Happy Cooking!

Monday, August 15, 2011

Freedom from oil.....Tricolour Tiranga Pulao....Happy Independence Day!


This one is an independence day special. The typical way to make a tiranga/tri-color rice is to cook three types of rice separately- a palak/spinach rice for green, carrot rice for the color saffron and then combine it with some plain rice in the midle for the final effect. Looks really nice and goes well with the Independence day spirit.

I was a little short on time today. The Independence day lunch organised by the building committee was called off at the last minute, cook had her day off and yet I was quite determined to make the meal special.

So an oil free recipe it was( in keeping with the Freedom theme), a one dish wholesome meal( read Pulao) and three different colored ingredients- carrots, beans and baby corn. The combination was definitely a visual treat and nobody seemed to miss the oil/butter/ghee.

With lean cooking( I have Sanjeev Kapoor, Nita Mehta and Karen Anand to thank- picked up all my basic tips about low oil/no oil cooking from their books) there are two basic rules:

  • Be patient because a good part of the cooking needs to be done on low flame. Some steps may need constant stirring. Try and use a good non-stick cookware.
  • The food is low on oil but high on flavor so some of the dishes(like this one) need a lot of ingredients- basic everyday use ingredients but quite a few nevertheless.

Tri-colored Rice/Tiranga Pulao(No Oil)
Serves: 4/5

Ingredients

Basmati Rice( choose the long grained variety): 1.5 cups
Onions: 2, finely chopped. You could also use Shallots- about 8/10 peeled
Ginger: Finely chopped, 1 tbsp
Tomatoes: 2, finely chopped. Choose large ones, this is a key ingredient when you are cooking with no oil
Carrots: 1/2, cut into 1/2 inch long pieces
Beans: 8/10, 1/2 inch pieces
Baby corn: 4/5, 1/2 inch pieces
Bay leaves: 1/2
Cumin seeds: 1 tsp
Green Cardamom: 2/3
Lime juice: 1 tbsp
Water: 3 cups

Method

  • Soak the Basmati rice for about an hour before you start cooking. Do follow this step for all Pulaos.
  • Heat a non-stick kadai/wok. Dry roast the bay leaves, cumin seeds and cardamom till fragrant.
  • Add the onions, ginger and tomatoes and cook for a few minutes till the tomato turns soft.
  • Add the vegetables, rice and mix well. Cook for a few minutes.
  • Transfer to a pressure cooker, add 3 cups of hot water( this prevents the rice from sticking, also helps cook faster) and the lime juice. Close the lid of the cooker and let it give out one whistle. Switch off the cooker and let it cool on its own.
  • Serve hot along with a cucumber-tomato- onion raita.
  • Enjoy.
Jai Hind!

Bon Apetit and Happy Cooking!

Sunday, August 14, 2011

Apple Pie...The Joys Of Baking.........


I bake cakes pretty regularly. With two " growing" boys who are forever hungry they also get polished off real quick. Several variations which include Plain cakes, Rainbow cakes(No fuss chocolate cake), Choco banana cake, Muffins get made every other week. Once you have got your measures and baking time right it is really easy. And the best part about baking a cake is that you just have to mix all the ingredients together( whether in one step or in stages) and then the dish cooks on its own. So set the timer to bake( usually 200 degree celsius unless the recipe specifies otherwise) and go ahead with getting the rest of your meal ready.

Tarts and pies on the other hand seem a lot more complex. I used to read and re-read short crust pastry recipes but could never really muster up enough courage to bake them. I am most impressed with people who can make a decent apple pie.

Apple pies have the " Wow" factor. You never quite get that response with a cake however complex the ingredients or labored the process. But once you have baked an apple pie successfully you will realize that it is actually pretty simple. Like with most other baking there are three easy steps: The crust, the filling and then assembling. That is it, you are done.

There are of course tips to bake the perfect pie, best learnt when you actually watch somebody bake( Food shows on TV/Demos on the Internet come fairly close- the latter you can watch over and over again till you get it right).

  • Tip #1: Always use ice cold water which is ice to which a little bit of water has been added.
  • Tip #2: Once you knead the short crust pastry dough, wrap it in a cling film and keep it in the refrigerator for at least 30 minutes. This is supposed to "chill the butter and relax the gluten"- not sure what that means but sure works.
  • Tip # 3: Mix the apple with the sugar, cinnamon, lime juice and let it stand for at least 30 minutes. The apple will give out water which you can separately thicken and pour back. If you skip this step and directly bake the apples will shrink and you would end up with a large gap between the baked apples and the top crust.
  • Tip#4: Resist cutting up the pie as soon as it is done( this is a sure test of your will power- the apple, cinnamon, butter combine as it bakes tastes just divine) as fruit pies need several hours to set. My suggestion would be to let the apple pie cool down and then store it in the refrigerator. When it is time to serve cut up a slice, warm it in the microwave for about a minute and serve. Refer Tip # 5
  • Tip#5: Excellent plain but even better with vanilla ice cream or whipped cream.

Thank you " A" for sharing your recipe, that was the starting point, got tweaked as I progressed. Incidentally the best apple pie that I have had was the one baked by A.

Apple Pie
Serves: 6/8( depends on the serving actually)

For the crust

Flour: About 1.5 cups, 250 grams
Butter/margarine: About two sticks, roughly 125 grams
Sugar: 1 tbsp
Salt: a pinch
Ice cold water: 4/5 tbsps

For the filling
Apple: 2 large firm ones that don't lose their shape when you bake
Cinnamon powder: 1 tsp
Sugar: 2/3 tbsps( check the apples for sweetness before you start adding the sugar)
Lime juice: 1 tbsp


Method

  • Start with the crust. Mix the flour, butter, sugar and salt together. Add water 1tsp at a time and slowly mix the dough till it is firm. Should hold together when pinched. Wrap the dough in a cling wrap and refrigerate.
  • For the filling: Macerate the apples by mixing the apple, cinnamon powder, sugar and lime juice. Let it stand for about 30 minutes. The apples would give out water. Drain in a colander and thicken the juice on the stove/microwave with some butter and add to the apples. Alternately( and this is what I did) just put the apples with the juice in a pan. Cook it on slow fire till the sauce thicken.
  • Putting it all together
  1. Take the dough. Keep a small part for the criss-cross cover( about 1/4th should do). Roll the dough into a 12 inch circle( for a 9 inch pie dish). You will need to keep lifting and turning the pastry as you roll to ensure it is of uniform thickness
  2. Transfer into the pie dish and trim the edges. This, is the only difficult step and don't be disheartened if you don't get it right the first time.
  3. Blind bake the crust in a pre-heated oven for about 5/7 minutes at 200 degree celsius.
  4. Next, sprinkle some flour and place the apples on the crust.
  5. Roll out the remaining dough into a circle and cut into thin strips. Place the strips vertically and horizontally as shown in the photograph to form a criss- cross pattern.
  6. Bake at 220 degree celsius for about 45 minutes.
  7. Serve warm
Pat yourself on the back for having mastered the recipe. Get creative and try making the filling with other fruits.

I have been on a high since the time I baked my first apple pie. Plan to try my hand at Tarts and Quiche next. So wish me luck!

Bon Apetit and Happy Baking!


Thank you for reading my posts.....

Top Blogs
The top Food in one place by Invesp

Powered By Invesp


Sunday, August 7, 2011

Stanley ka dabba....Happy Friendship Day!


  • The movie, " Stanley ka dabba", is on showcase and I am hoping to watch it this evening. Anyone who has seen the movie tells me that it took them back to school and they thought of all their classmates with whom they had shared their lunch boxes.


Talking about school, I too have some very fond lunchtime memories. There were about 10 of us who assembled around a makeshift lunch table( one of the spare tables in the class) every afternoon during the break. We would all place our dabbas on the table(very plain, basic plastic/steel ones). One lunchbox would be opened at a time and the entire pack would attack the contents. Funny but even after years I remember what each one of them usually got( yes, there wasn't too much variety but we loved each other's dabbas nevertheless). N always got apples( yes, all through the ten years we studied together she got sliced apples and never did she get to eat more than a slice), S got curd rice with manga( small mangoes soaked in brine with a slight bitter after taste) or Parota kurma, P and Sa often got gongura rice ( hot, fiery stuff which I just loved. " I have got your favorite today", P would whisper during the class at the start of the day and I would eagerly wait for the break to grab more than my fair share). R got paratha and alu fry, Sh got chinni paratha, B got alu paratha or paratha shredded into small pieces and then cooked in ghee and sugar. Thanks to our cosmopolitan class we did get to sample a little bit from the different parts of the country. Strange but I am a little fuzzy about what I carried in my lunchbox. I remember twice a week it was idli sambhar. Mom( in the pre tupperware/no spill proof container days) packed the sambhar in old nescafe jars to prevent them from spilling. Sis and me had a deal. I would carry the bag on the way to school and she would carry it back. I had to balance the lunch bag gingerly making sure I did not spill the contents, she on the other hand just bundled the bag with the empty dabbas/bottles and shoved them into her school bag. Yes, stupid me. Guess 'the love for food' took over common logic.

This post has brought back so many memories. The special lunch boxes that we would carry on our birthdays. Mom would send me hot alu chop( alu bonda) and ghuguni( patiala matar). I remember our man friday cycling furiously to make it on time for the lunch break- he would be greeted with screams from all my classmates.

Yes, it was a lot of fun and we definitely bonded over food. We happily shared whatever we carried. Much of that I am sure still remains in today's schools but children want more variety and something interesting each day( as with most things aimed at this generation including education "packaging" is important).

Here is the good old grilled sandwich, best eaten hot, tastes nice in the lunchbox too.

Grilled Vegetable Sandwich
Serves : 2
Ingredients
Brown bread: 4 slices
Boiled Potatoes: 2 large
Mixed vegetables: Beans, carrots, peas, cauliflower- chopped fine and sauted.
Cheese: 1/2 a cube per sandwich, grated
Cheese spread: 1 tbsp per sandwich
Salt and pepper to taste

Method


  • Mash the boiled potatoes.

  • Add the vegetables, grated cheese, salt and pepper. Mix well.

  • Next, spread the cheese spread on both the bread slices. Places the vegetables on one slice and cover with the other.

  • Grill for about 7/10 minutes for it to turn golden brown and for the cheese inside to melt.

  • Cut into triangles and serve with tomato ketchup.

If making it for the lunchbox, grill for about 5 minutes to allow the bread slices to stick together. Leave the bread a little soft otherwise it will harden as it cools down.


You can keep varying the filling. Any leftover vegetable/grilled chicken with some cheese would taste good.


I hope my children will look back( as fondly as me) at their lunchtimes and lunchbox friends. Here is to all the friends they will make and to some strong relationships that will stand the test of time.


Bon Apetit and Happy Cooking!


Aaam ke aam guthliyon ke daam...


No, not one more post about mangoes. Done with them for this season I guess. This post is about a rather unusual dish that I got to sample about two weeks back. Delighted by the taste I have been asking for more.
Unless you are from Eastern India the dish will sound strange. It is made with Parwal(Potol) and Alu(Potato) peel. Yes, you read that right. Vegetable peel has uses beyond the face pack.

In the East we typically cook vegetable peel with some mustard paste( in the days of the joint families and tons of household help, enough vegetable peel got collected from a day's cooking). Mix the vegetable peel with the ground mustard paste and let it cook in the embers(remember most of the cooking got done in wooden fires) after all the cooking had been done. I have had this before. Both Grandma and later my Mom used to make this at home during my growing up years.

But this one made by my help from Bangladesh was quite different in texture/form and taste. Unless somebody told you that it was made from the vegetable's peel I bet you would not be able to guess. IncidentallyBangals make better cooks than ghottis( people from West Bengal). I have more friends from East Bengal and have sampled some great food. Potoler Kouda as it is called(I just discovered) is perfect as an accompaniment with plain rice or roti.

Potoler Kouda
serves: 2
Ingredients
Peel of about 14/15 medium sized potol/parwal
Peel of 2 large sized potatoes
Onion: 1 large onion, sliced fine
Kalonji/kala jeera: 1 tsp
Green chillies: 1/2( according to taste)
Oil: 2 tbsps

Method


  • Boil the potato and potol peel for about ten minutes to soften them.

  • Drain the water and grind to a fine paste along with 1/2 green chillies

  • Heat the oil in a kadai( I am told the more oil you use for this dish the tastier it is going to be, I would suggest you stay with not more than 2 tbsps), add the kalonji and let them sputter.

  • Next add the sliced onions and wait till they turn glassy.

  • Add the ground paste and keep sauteing till it dries up and starts to leave the side of the kadai.

  • Serve hot.

Made with the most basic of ingredients and packed with a lot of goodness and taste. Remember your early lessons, the peel has the maximum nutrition. It is the simplicity of this dish that makes it truly unique. I am told this tastes best with " sedho bhaat"( steamed rice). I have tried it as a spread on toast. While I know this is an unusual twist to a traditional dish it tastes quite nice. As I write the post I see the dish making its way as canape toppings, add some hung curd to it and viola a nice, spicy dip. Yes, some creativity and an experimentative palate will see this going places.


Bon Apetit and Happy Cooking!

Last of the mangoes.....


Mango season is almost over. Mumbaikar are united in their Apoos( Alphonso to the uninitiated) obssession - in fact it is the only type of mango a true blue Mumbaikar claims to like. Delhites however debate over a more varied fare: Dusheri, Langda, Chausa, Safeda. If prices are a surrogate for measuring appeal then "langda" looks to be the winner.

Mango is best eaten by itself. Slice them with the skin and then scoop them with a spoon, peel the skin and cut them into small pieces and then eat them with a fork or if they are nice, soft and juicy- slit the top and suck the juice- messy but a lot of fun.

Of course tastes nearly as good in other forms too- icecreams( serve it with a vanilla icrecream or make a mango icecream), in shakes, as cheese cakes, as a salad dressing, as a dip(mango mayonnaise dip), mango with cream( I will vouch for the one sold at Haji Ali- over priced but really nice, packed in ice if you want it as a takeaway).

Just the way a ripe banana inspires you to make a banana cake, an over ripe mango urges you to turn it into a shake. My older one loves a milk shake and I find it an easy way to get him to have a big glass of milk and fruits. Often on weekdays he has it as a breakfast substitute. Since it is the weekend I made him a special shake. Needless to say he loved it( you cannot go terribly wrong when you have ice cream, mango, condensed milk as the ingredients).

Special Mango Shake
Serves 1
Ingredients
Mango: 1 small sized mango, remove the peel and chop into small pieces
Milkmaid/condensed milk: 1 tbsp
Milk: 1.5 cups
Vanilla icecream: 2 tbsps

Method


  • Put all the ingredients in a mixie and whip for 2/3 minutes


  • Check for sweetness.


  • Serve chilled


  • Watch them go yumm! yumm! yumm!


A really quick anytime drink. Great during the summer hols when kids are home and forever hungry. Also helps them stay away from aerated drinks and bridge snacks.


Bon Apetit and Happy Cooking!

Saturday, August 6, 2011

Redifining "ghaas phoos"..

Modern day salads have repositioned "healthy eating". People today opt for salads by choice, for the taste and not because they have been asked to go easy on oil and/or spice.
So much so that a popular women's magazine had a salad supplement with its last issue, as many as 100 salads, many of them modified to suit the Indian palate. There were some interesting options though some I think had been stretched/forced fit to make the number 100.

So from being prepared with basic vegetables like cucumber, tomato, onion( with raddish, carrot and beet root added in the winter months) salads have graduated to getting more exotic with names such as tossed rice salad/lentil salads/pasta salad/carrot and raising salad. We think far more innovatively today when we are making salads. I keep adding ingredients even after I have started making the salad. Chicken in the salad below was an afterthought( in fact a substitute for salami strips that I normally add). I added the bread croutons since I was serving it as a meal, would have skipped it if I was serving the salad as a meal accompaniment. They are so handy when you are entertaining, no last minute bother of heating or frying. Keep the ingredients ready, toss them all together and serve. Served as starters too. Most salads can be prepared way ahead and served chilled. Keep a little bit of the seasoning handy in case all of it gets absorbed.
We had an interesting salad last night for dinner and so I have named it after the day of the week( sorry, been rather uninnovative in naming the dish but just could not think of any other name).

Saturday salad
Time: 20 minutes, serves: 1/2

Ingredients
2 bunches of lettuce
2 cups of boiled veggies(beans, carrots, baby corn)
1/2 cup of sauted mushrooms( use half of the regular pack, quarter and cook in a little bit of olive oil, add some salt and pepper to it)
Cherry tomatoes: a handful, these add a lot of colour to the salad, are convenient to use and have a nice, sweetish taste
Olive oil( for the seasoning): 2 tbsps
Garlic: 6/7 large pods, chopped fine
Bread: 1 slice, toast and then chop into small squares
Chicken(optional): boiled and shredded( I use leftover curry pieces- remove the masala and shred them into thin strips- a good way to re-use leftover chicken)
Dried herbs: 1 tsp( I used Basil but oregano would also go well as a seasoning for the salad)
Lime juice: 1 tbsp( half a lime)

Method


  • Place the lettuce in ice cold water to refresh. Leave it in the water for about thirty minutes, take out, gently squeeze out the water and shred into large pieces( never chop the lettuce)

  • Take a large bowl, place the lettuce in it.

  • Then add the boiled vegetables, sauted mushrooms, cherry tomatoes to it.

  • To make the dressing: Heat the olive oil in a small wok/tadka pan, add the garlic and let it turn brown, remove from the flame and add Lime juice, Basil and some salt. Mix well.

  • Add the dressing to the salad and toss the vegetables lightly.

  • Top with bread croutons and serve immediately.

This is a meal by itself. You could serve also serve it along with a clear soup. Lettuce adds a lot of volume to this salad so the portion size is a little deceptive. The portion shown in the accompanying picture serves one adult only.

As with the corriander pulao, this salad combines some fairly varied ingredients for a really flavorsome bite. Be a little generous with the olive oil else the veggies would taste dry. The burnt garlic gives the salad a distinctive taste and helps spice up an otherwise bland fare. Instead of the croutons you could add a handful of pasta, leftover pasta would be even better.

Another successful one dish meal. Bon Apetit and Happy cooking!

Yum!


The title of this post is inspired by a talk I heard this morning. The Managing Director of Yum Foods(the group that owns brands such as KFC, Pizza Hut and Taco Bell) addressed us at work this morning- a very inspiring speech, related to good food(my kids would vouch for the brands) and I decided that I just had to get back to the blog. It has been a long break- over two months. I have been cooking, trying out new recipes but have somehow not managed to click pictures or write about them.


So back from the break with my favorite theme, " one dish meals". And though I hardly eat rice these days I think our very own "desi pulao" tops the charts when it comes to one dish meals. And thanks to the pressure cooker/rice cooker the pulao gets done in a jiffy too. So full marks on nutrition, taste and convenience. And while the rice gets done and the cooker cools you assemble the raita. Perfecto!


If you are making a veggie pulao you can team it with a plain raita( dahi to which a wee bit of sugar, some black salt or chat masala and bhuna jeera has been added or maybe if you are feeling a little more indulgent then a dahi boondi). And I never fail to get amazed by the number of different types of Pulaos/mixed rice that can be prepared. From the basic jeera(cumin) rice( now this goes well with an elaborate dinner, as a substitute for steamed rice- looks and tastes way better), to the peas pulao( Jeera rice to which you add a handful of shelled green peas- no extra effort, frozen green peas have a permanent place in the freezer- I know of families in Delhi who painstakingly shell peas during the Winter months, then blanch and store them in small single serve zip lock pouches and use it through the year. For those of you who don't want to go through the trouble there is always the Safaal peas). Sorry I got a little carried away. And then of course the regular vegetable pulao and variations therefore like vegetable pulao with tomato, vegetable pulao with paneer, the one Maharashtrians make with goda masala, the traditional vegetable pulao with kaju(cashew), kishmish( raisins)- this one used to be a regular at all family weddings. The list is actually endless and over the next two/three weeks I plan to try out a couple of new types. So watch this space for more.


The pulao I made this evening has just one added ingredient which sets it apart from the regular ones- green corriander( hara dhania) ground to a fine paste with ginger, garlic and green chillies. Gives the pulao an unusual green colour and a really flavorsome taste. Gets done in under 10 minutes and goes well with a regular raita. As the vegetables are cooked and added separately there is no fear of them getting over cooked or the pulao turning lumpy. I think this pulao would taste really good on cold winter evenings with seasonal vegetables like cauliflower, carrots, beans etc.


Corriander Pulao


Cooking time: 10 minutes, serves 4


Ingredients


Basmati rice: 1 1/4 cup, if you are making a pulao try using Basmati rice, Tukda Basmati should also work well. Soak the rice for at least half an hour prior to cooking


Oil/ghee: 2 tbsp


Mixed vegetables, finely chopped: 2 cups( I used beans, carrots, mushroom and baby corn).


Onions: 2, finely sliced


Mustard seeds: 1 tbsp


Curry paste: Grind together 1/2 inch ginger, 3 cloves garlic, 2 tbsp green corriander, 2 green chillies, 1 tsp cumin powder, 1 tsp corriander powder,1/2 tsp turmeric powder to a fine paste


Water: 2 cups( prefferably warm water as that prevent the rice from sticking to each other and you get a nice fluffy pulao).


Method


  • Heat 1 tsp oild and stir fry the vegetables with some salt and keep aside. This should not take more than a few minutes as they would have been chopped fine.


  • Next heat the oil in a pressure cooker. Add the mustard seeds, once the mustard sputters add the onion and fry for a minute or two.


  • Next add the curry paste and saute till the raw smell of ginger garlic is no longer there. This should take a few minutes.


  • Add the rice and stir for a minute.


  • Add the water, close the lid of the pressure cooker and let it give out one whistle.


  • Take the cooker off the flame and let it cool down. Open the lid and add the vegetables, mix well.


  • Serve with a cucumber, tomato, onion raita.


I loved the spicy taste which got perfectly balanced with the raita. However if making it for young children I would recommend you skip the green chillies.


There are two new interesting dishes that I have made today. Yes, happy to be on an overdrive. Hope to blog about them soon. Writing about them makes cooking a lot more fun. And making everyday dishes blogworthy is even more fun, you invariably try harder.


Till then, Bon Apetit and Happy Cooking!